Saturday, October 16, 2010

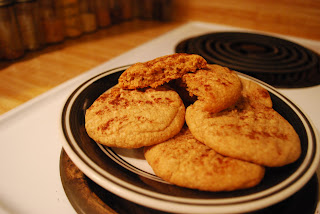
Peanut Butter Cinna Cookies

 Oh, peanut butter cookies; how far we have come. I remember when I used to court you back in my younger days when I was just a wee little chef, and our romance has only continued to blossom over the years. I have experimented with you (which you seemed to enjoy), and while I am not done, it seems I have found one version of you that is simply scrumptious.
We will meet again soon though, do not fret my love.


*cough cough* 
Anyway. So this version of the peanut butter cookie is one of my favorites! I went through a lot of cookies over the years to get to this point, and I plan to keep moving forward.
These are good because they're soft and chewy, and the cinnamon doesn't overwhelm the taste of the peanut butter.

Here is how to create this concoction of goodness.

Ingredients:
  • 1 cup unsalted butter (which is about two sticks of butter) at room temperature
  • 1 cup crunchy or creamy peanut butter
  • 2 eggs
  • 1 cup white sugar
  • 1 cup packed brown sugar
  • 1 teaspoon baking soda
  • 2 1/2 cups all purpose flour
  • 1/2 teaspoon salt
  • 1 1/2 teaspoons baking powder
  • 1 teaspoon cinnamon (plus some later to sprinkle on the cookies)
Directions: 
  • Begin by carefully mixing together the flour, baking soda, baking powder and salt in a bowl - set aside.
  • In another bowl cream together the white sugar, brown sugar and butter - once that is done, add the peanut butter and cinnamon - then finally, add the eggs and mix it all together really well.
  • Now begin to slowly add the flour mixture to the other mixture - it's a good idea to add the flour at small intervals because it's much easier to mix.
  • Once they are successfully mixed together, cover the batter with something (such as plastic wrap, or a plate) and set in the fridge for about twenty minutes.
  • After about ten minutes, preheat the oven to 370 degrees.
  • Now that the twenty minutes has gone by, take the mixture out of the fridge and prepare to make some balls!
  • Make 1 inch balls and place them on a baking sheet - then take a fork and make a crisscross patten on each of the cookies. Then finally take your cinnamon and sprinkle some on top of each cookie.
  • Place them in the oven for 10-15 minutes or until they are brown - be careful not to overcook them or they won't be soft and chewy.
  • Continue until you've used all your batter - or like in my case, until you and others eat the last of the batter.

This make about four dozen cookies, so there will last awhile. Unless of course you sit and eat five or six in one sitting.
Not that I did that or anything.


Copyrighted by Ruki.

October 2010.
Wednesday, September 8, 2010

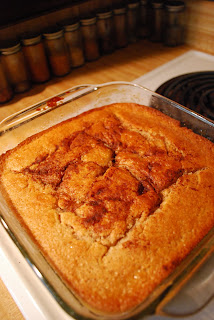
Peach Cobbler

After realizing that I have never, in fact, eaten Peach Cobbler, I felt inclined to make it in order to fix the problem.
 
 
This is actually the second attempt in making the Peach Cobbler after the first attempt didn't go as planned. I used a slightly smaller pan then the recipe called for, and it overflowed onto the bottom of the oven. But practice makes perfect...and also a mess, right?

So on I went to the second attempt, and after downsizing the portions of the ingredients it turned out much, much better :)

Here is how to create this delicious cobbler to gobble up!

Ingredients
  • 4 cups peaches (which was about 4 medium sized peaches)
  • 1 cup sugar, and 3/4 cup sugar (used at separate times)
  • 1/2 cup water
  • 1 stick butter
  • 1 cup self-rising flour
  • 1 cup milk
  • Ground cinnamon
Directions 
  • Preheat oven to 355 degrees, and get out a 9x9 baking pan.
  • Peel and slice the peaches, putting them into a saucepan.
  • Combine 1 cup sugar and 1/2 cup water with the peaches, and after bringing it to a boil turn it down and let it summer for 10 minutes.
  • While the peaches are simmering, place the stick of butter into the baking dish and put it into the oven so it melts.
  • Now mix the 3/4 cup sugar, 1 cup flour and 1 cup milk in a bowl - make sure to stir constantly so that it doesn't clump. After you've mixed it together, add 1 teaspoon cinnamon and mix in.
  • Take the baking pan out of the oven, and carefully pour the batter over the melted butter - do not mix! Then gently spoon the fruit on top of the mixture, and then pour half of the remaining syrup over the top.
  • Sprinkle it with cinnamon, and then place it in the oven.
  • Bake for 45 minutes - and then if you want, you can broil it for a few minutes to make the top crispy!

And then what to do? Enjoy of course! It's especially good with whipped cream, or vanilla ice cream!
 

Copyrighted by Ruki.
September 2010.

Tuesday, August 17, 2010

Blueberry Muffin Cake

What exactly is a blueberry muffin cake, you ask? It's simple. It's what you end up with when you start making muffin mix, only to realize that you have no muffin trays.
So you end up with a delicious muffin cake :)


This is one of the easiest recipes I've ever made, mostly because it doesn't take much effort and it comes out being delicious!

Here is how to accomplish this delicious piece of deliciousness.

Ingredients
  • 1 2/3 cups all purpose flour
  • 1 teaspoon baking soda
  • 2 teaspoons baking powder
  • 1 cup yogurt
  • 1 egg
  • Two pinches of salt
  • 1/2 vegetable oil
  • 1 cup sugar
  • 1 1/2 cup blueberries (Fresh or frozen)
  • Vegetable spray or butter to grease the pan

Directions
  • Preheat oven to 380 degrees F and grease a 9 x 9 baking pan.
  • Mix together the flour, baking powder, baking soda and salt in a large bowl. Take out a tablespoon of the flour mix and sprinkle it over the blueberries, coating all of them.
  • In another large bowl, cream the sugar, oil, egg and yogurt together until smooth.
  • Slowly add the dry mixture into the wet mixture, and stir for 15 seconds. Then add in the one cup of blueberries, saving the 1/2 cup for later use.
  • Pour the mixture into the greased pan, and after smoothing out the top, add the remaining 1/2 cup of blueberries to the top and press down lightly.
  •  
    Place in the oven for 30-35 minutes or until a butter knife is inserted in the middle, and it comes out clean.
    Let it cool down for about ten minutes, then enjoy!


    Copyrighted by Ruki.
    August 2010.

    Little Bleedin' Heart Cookies

    Despite the slightly morbid name, these cookies are actually really delicious! They're sugary and sweet, and also prettttyyyy.


    The idea started out pretty simple. I looked in the fridge one day and noticed that we had a large bowl of strawberries that were going bad, and knowing that they were most likely just going to get thrown away, I decided to bake them into something delicious!

    First things first, I had to decide what exactly I wanted to do with the strawberries; and what was that little voice in the back of my mind saying? "Make strawberry filled cookies, Ruki! Makkee themmmm!".

    And so, I started out with the basic recipe for sugar cookies. Why sugar cookies? Because for one, their flavor won't overpower the taste of the strawberries, and two, sugar cookies will bake in whatever shape you mold them!

    Start by making the filling!

    Strawberry Filling Ingredients
    • 1/2 cup strawberry jelly
    • 5 strawberries - cut into smaller pieces
    Directions for the Jam
    • Add both the jelly and the strawberries into a bowl and mash with a fork until it turns into a jam. Place in the fridge until later.
    And then move to the cookies!

    Sugar Cookie Ingredients
    • 2 3/4 cups all purpose flour
    • 1 teaspoon baking soda
    • 1/2 teaspoon baking power
    • 1 cup butter, softened
    • 1 1/2 cups white sugar
    • 1 teaspoon vanilla extract
      1 egg 
    Directions
    • Preheat oven to 375 degrees F and grease a cookie sheet.
    • Begin by combining the dry ingredients - flour, baking soda, baking powder - and mixing them together.
    • In a separate bowl, whisk the butter and sugar together until they are smooth, and then add the egg and vanilla.
    • Gradually add in the dry ingredients and mix until the dough pulls away from the side of the bowl - if it does not, slowly add more flour until it does.
    • Roll the dough into 1 inch balls and place them on the sheet, then carefully press your thumb into the center of the ball in order to create a small hole to put the jelly. Repeat until all the dough is gone.
    • Put the cookies in the oven for 8-9 minutes.
    • Take them out of the oven and carefully spoon the strawberry filling into each of the holes in the cookies - be careful not to add too much, or they will fall out of the cookie while baking.
    • After filling each cookie, place them back in the oven for 10-12 minutes or until the cookies are lightly browned on top. Let them cool for 10 minutes.

    And then? Enjoy!


    Copyrighted by Ruki
    August 2010